
Oh my gosh, do you remember those sticky-fingered afternoons making Rice Krispie treats as a kid? I swear, the smell of melting marshmallows still takes me right back to my grandma’s kitchen. That’s exactly why I went wild when I first tried combining that nostalgic crunch with creamy ice cream – hello, Rice Krispie Ice Cream magic! It’s like someone took all the best parts of childhood and froze them into one perfect dessert. Trust me, this no-bake wonder is about to become your new go-to for potlucks, birthday parties, or those “I need something sweet NOW” moments.
Why You’ll Love This Rice Krispie Ice Cream Recipe
Listen, I know you’re busy – that’s exactly why this recipe is pure gold. Let me count the ways you’ll adore it:
- No oven required – Seriously, just a stovetop and freezer. Perfect for when it’s too hot to bake (or you’re just feeling lazy).
- Ready in 15 minutes flat – The active work is done before your favorite song finishes playing.
- Crowd-pleaser magic – Kids go nuts for it, and adults secretly sneak second helpings.
- Endless variations – Swap ice cream flavors or mix in toppings to make it your own.
The best part? That glorious crunch-meets-cream texture that’ll have everyone asking for your secret.
Ingredients for Rice Krispie Ice Cream
Okay, let’s talk ingredients – and I mean the good stuff that makes this dessert sing. You’ll need:
- 3 cups Rice Krispie cereal – That classic “snap, crackle, pop” is non-negotiable
- 4 cups vanilla ice cream – Softened means leave it out for 10-15 minutes (you want spreadable, not soupy!)
- 1/4 cup unsalted butter – Cold butter straight from the fridge – no substitutes, please
- 10 oz marshmallows – One standard bag does the trick
- 1 tsp vanilla extract – The secret whisper that makes everything better
- Pinch of salt – Just a tiny bit to balance the sweetness
Pro tip: Measure your cereal after pouring – those little guys settle in the box!
How to Make Rice Krispie Ice Cream
Alright, let’s get to the fun part – making this magical dessert happen! The process is simple, but I’ve got some insider tips to make sure your Rice Krispie Ice Cream turns out absolutely perfect.

Step 1: Prepare the Rice Krispie Base
First, grab your largest pot (trust me, you’ll need the space) and melt that butter over low heat. I know it’s tempting to crank up the flame, but patience is key here – we don’t want any burnt butter flavors sneaking in. Once it’s melted, toss in all those marshmallows and start stirring like your dessert dreams depend on it (because they kinda do). Keep stirring until every last marshmallow is completely melted into a smooth, glossy goo. Remove from heat, then mix in your vanilla and that tiny pinch of salt that makes all the difference. Now, gently fold in the Rice Krispies until they’re completely coated in that sticky goodness.
Step 2: Layer with Ice Cream
Here’s where things get exciting! Press half of your Rice Krispie mixture into a greased 9×9 pan – I like to use the back of a measuring cup to really pack it down evenly. Now for the star of the show: that softened ice cream. Spread it carefully with an offset spatula (or the back of a spoon if you’re improvising) to create a smooth, even layer. No rushing here – take your time to get right to the edges without any gaps. Then top with the remaining Rice Krispie mixture, pressing gently so it sticks but doesn’t squish the ice cream layer beneath.

Step 3: Freeze for Perfect Texture
Pop your masterpiece into the freezer for at least 4 hours – I know, the wait is torture, but it’s so worth it! If you can resist temptation, letting it freeze overnight gives you those picture-perfect squares that hold their shape when you cut them. The ice cream needs time to firm up properly between those crispy layers. I usually make this the night before I need it – future you will be thanking past you!
Tips for the Best Rice Krispie Ice Cream
After making this recipe more times than I can count (okay fine, I lost count after the third batch last week), here are my hard-won secrets:
- Grease your knife – Run it under hot water and dry it before slicing for clean, crumb-free cuts
- Press firmly – Really pack those Rice Krispie layers to prevent crumbling when serving
- Work quickly – The marshmallow mixture starts setting fast, so have everything ready before you start
- Line your pan – Parchment paper with overhanging edges makes removal a breeze
Oh! And always lick the spoon – that’s not a tip, that’s just mandatory happiness.
Rice Krispie Ice Cream Variations
Oh, the possibilities! This recipe is like a blank canvas for your dessert dreams. Swap that vanilla ice cream for chocolate and suddenly you’ve got a cookies-and-cream vibe going. Strawberry ice cream? Hello, nostalgic Neapolitan flavors! My personal favorite trick: sprinkle mini chocolate chips or rainbow sprinkles between the layers before freezing. Kids go wild when I add crushed Oreos to the Rice Krispie mixture – just saying!

Serving and Storing Rice Krispie Ice Cream
Let’s talk about the real art of serving Rice Krispie Ice Cream Bars — because trust me, timing is everything. Straight from the freezer, they’ll be a little too firm to slice cleanly. But give them just 5 minutes at room temperature, and you’re in that sweet spot where the ice cream softens just enough, and the Rice Krispie layer is still perfectly crisp. Wait too long, though, and you’ll end up with a gooey mess instead of those beautiful layers you worked so hard to create.
When you’re ready to serve, grab your sharpest knife and run it under hot water. This little trick makes slicing smoother and cleaner. Be sure to wipe the blade between cuts—you’ll thank yourself when you see those tidy, picture-perfect squares. These bars are a showstopper at parties and potlucks, and that clean cut makes all the difference for that Instagram-worthy presentation!
Now, if you’ve managed to resist eating the entire tray (which, let’s be honest, is a feat in itself), you’ll want to store your leftover bars properly. Wrap each bar tightly in plastic wrap or store them in an airtight container to prevent freezer burn and keep them tasting fresh. They’ll stay good for up to 7 days in the freezer, but if your household is anything like mine, they’ll disappear by day three—max. Honestly, they’re that irresistible.
Rice Krispie Ice Cream Nutritional Information
Okay, let’s be real here—we’re not enjoying Rice Krispie Ice Cream Bars because they’re a superfood. This is pure indulgence, and we love it that way! That said, if you’re curious about what you’re biting into, here’s a rough nutritional breakdown.
Each square (based on an average-sized bar) contains approximately 280 calories. The majority of these come from the vanilla ice cream and mini marshmallows, which bring in the sugar content. The butter (glorious, golden butter!) adds that rich, creamy texture we all crave and, of course, a good dose of fat. The Rice Krispies cereal adds the crispy crunch and gives it that classic childhood twist we adore.
Keep in mind, this is just an estimate. The actual nutrition can vary based on the brands and quantities you use—especially if you swap in flavored ice cream, extra marshmallows, or fancy mix-ins. If you’re watching your sugar or calorie intake, maybe just savor a smaller square. Or don’t. Honestly, these treats are meant to be enjoyed guilt-free and in good company.
So there you have it—a fun, freezer-friendly treat that’s as easy to serve as it is to devour. Whether you’re slicing up a tray for guests or sneaking a midnight bite, Rice Krispie Ice Cream Bars are the perfect way to treat yourself. Just remember: patience when serving, and airtight containers when storing. And don’t be surprised when everyone asks for seconds!
Frequently Asked Questions
Can I use homemade ice cream in this recipe?
Absolutely! Just make sure it’s soft enough to spread easily – homemade ice cream tends to freeze harder than store-bought. Let it sit out until it’s the consistency of soft-serve before layering. If it gets too melty, pop it back in the freezer for 5 minutes. My strawberry basil homemade version was a total game-changer in this recipe!
Can I substitute the butter with margarine or oil?
Oh honey, don’t even think about it! Grandma would roll over in her grave. That butter is what gives the Rice Krispie layer its perfect chew and helps everything hold together. Margarine makes it greasy, and oil just won’t work. Trust me on this – splurge on the good butter for this one.
Can I make this ahead for a party?
You bet! In fact, I always do. The flavors actually get better after a night in the freezer. Just wrap it tight so it doesn’t pick up any weird freezer smells. Pro tip: I sometimes assemble individual servings in muffin tins – perfect portion control (or so I tell myself).
For More Recipes : Facebook, Pinterest
Print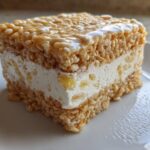
Rice Krispie Ice Cream
- Total Time: 4 hours 25 minutes
- Yield: 9 servings 1x
- Diet: Vegetarian
Description
A simple and delicious no-bake dessert combining Rice Krispie treats with ice cream for a crunchy and creamy treat.
Ingredients
- 3 cups Rice Krispie cereal
- 4 cups vanilla ice cream, softened
- 1/4 cup unsalted butter
- 10 oz marshmallows
- 1 tsp vanilla extract
- Pinch of salt
Instructions
- Melt butter in a large pot over low heat.
- Add marshmallows and stir until fully melted.
- Remove from heat and mix in vanilla extract and salt.
- Fold in Rice Krispie cereal until evenly coated.
- Press half the mixture into a greased 9×9 pan.
- Spread softened ice cream evenly over the Rice Krispie layer.
- Top with remaining Rice Krispie mixture and press gently.
- Freeze for at least 4 hours before serving.
Notes
- Use any ice cream flavor you prefer.
- For a firmer texture, freeze overnight.
- Cut into squares with a sharp knife for clean edges.
- Prep Time: 15 minutes
- Cook Time: 10 minutes
- Category: Dessert
- Method: No-Bake
- Cuisine: American
Nutrition
- Serving Size: 1 square
- Calories: 280
- Sugar: 22g
- Sodium: 150mg
- Fat: 10g
- Saturated Fat: 6g
- Unsaturated Fat: 3g
- Trans Fat: 0g
- Carbohydrates: 45g
- Fiber: 1g
- Protein: 3g
- Cholesterol: 30mg


