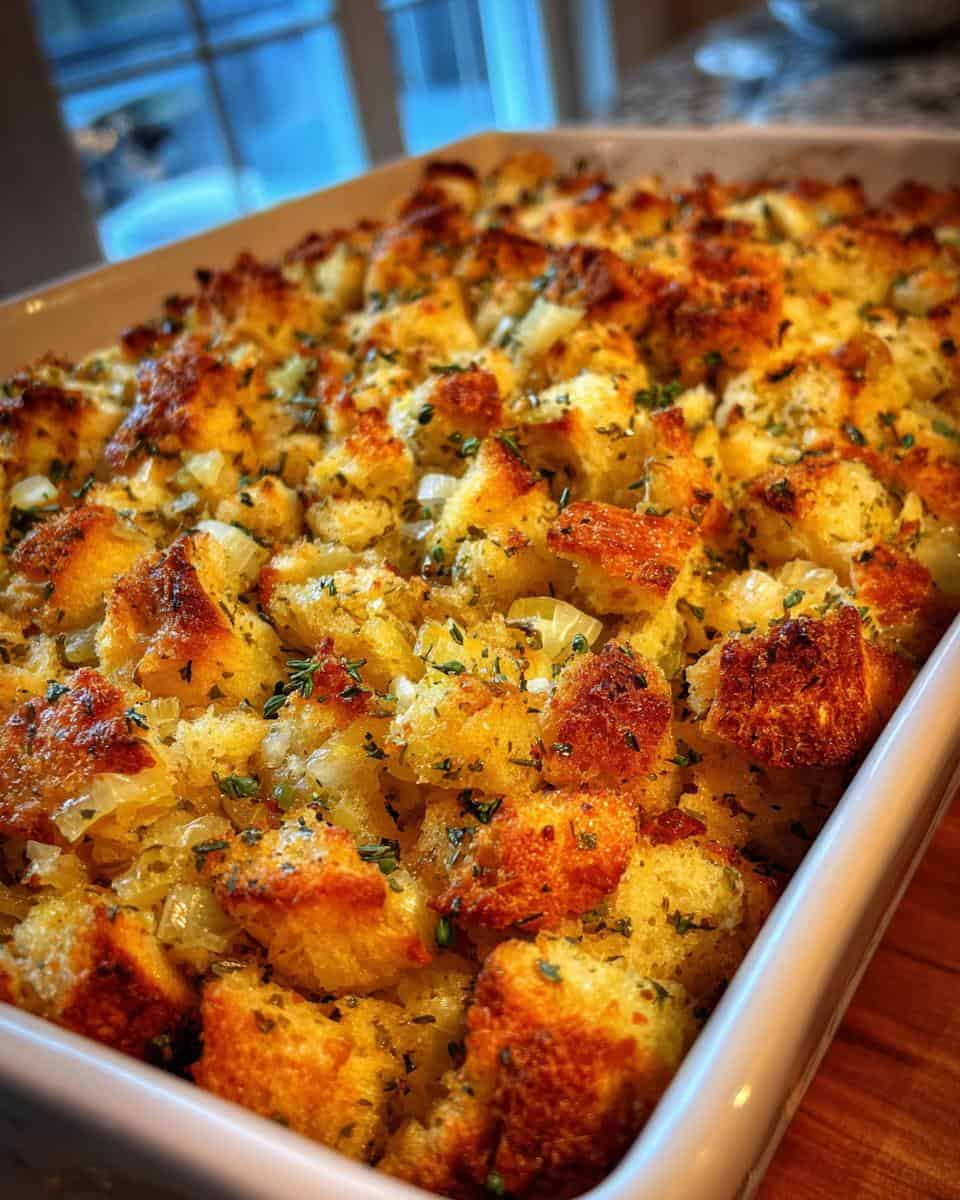
Oh, the smell of stuffing baking in the oven – it instantly takes me back to my grandma’s kitchen during the holidays! That golden, herby goodness was always the first dish to disappear from the table. Now, I make this Pepperidge Farm stuffing recipe every year because it’s just so darn easy and delicious. Seriously, with just a few simple ingredients and about 10 minutes of prep, you’ll have a side dish that tastes like you spent all day on it. The best part? That perfect balance of crispy top and soft, flavorful middle that makes everyone go back for seconds (and thirds!).

Why You’ll Love This Pepperidge Farm Stuffing Recipe
Trust me, this stuffing recipe will become your new holiday staple – and here’s why:
- Effortless elegance: That blue bag of Pepperidge Farm does most of the work for you – just add a few fresh ingredients and boom, instant crowd-pleaser
- Perfect texture every time: The bread cubes hold up beautifully, giving you that ideal mix of crispy edges and pillowy-soft center
- Customizable canvas: Start with this base recipe, then make it your own with sausage, apples, or whatever mix-ins your family loves
- Leftovers magic: Honestly? I think it tastes even better the next day fried up in a skillet with a runny egg on top

Ingredients for Pepperidge Farm Stuffing Recipe
Here’s what you’ll need to make this simple yet incredible stuffing – I promise you probably have most of this already in your pantry!
- 1 (14 oz) package Pepperidge Farm Herb Seasoned Cubed Stuffing – That iconic blue bag is key for the perfect base
- 1/2 cup (1 stick) butter – Real butter only, please! It makes all the difference
- 1 cup chopped onion – About 1 medium onion, diced nice and small
- 1 cup chopped celery – Include those leafy tops for extra flavor
- 2 cups chicken broth – I use low-sodium so I can control the salt
- 1 tsp each dried sage and thyme – Rub between your fingers to wake up the oils
- Salt and pepper to taste – Always taste before baking!
See? Nothing fancy – just good, honest ingredients that work magic together.

Equipment You’ll Need
You don’t need anything fancy for this stuffing – just these basics from your kitchen:
- Large skillet – For sautéing those onions and celery to perfection
- 9×13 inch baking dish – My go-to size for the perfect stuffing thickness
- Aluminum foil – Essential for keeping moisture in during baking
- Wooden spoon – For mixing everything together without scratching your pan
- Chef’s knife and cutting board – For prepping the veggies
That’s it! Now let’s get cooking.
How to Make Pepperidge Farm Stuffing
Okay, let’s get to the good stuff! Making this stuffing is seriously foolproof – just follow these simple steps and you’ll have golden, fragrant perfection in no time.
Preparing the Vegetables
First things first – grab that onion and celery. You’ll want to chop them into small, even pieces (about 1/4-inch dice) so they cook evenly. No giant chunks here! I like to run my knife through the celery leaves too – they pack so much flavor. The smell of onions sizzling in butter? That’s when you know the magic is starting.
Combining the Ingredients
Once those veggies are soft, dump in the stuffing mix and herbs. Stir everything together until the butter coats every cube – this is key for maximum flavor. Now slowly pour in the chicken broth while mixing. You want everything moist but not soggy – think “damp sand” texture. Let it sit for 5 minutes so the bread can drink up all that goodness before baking.
Baking the Pepperidge Farm Stuffing
Spread your mixture into the greased baking dish and cover tightly with foil. This keeps all the moisture in while it bakes. After 30 minutes, take off the foil – hello, golden top! If you like it extra crispy, pop it under the broiler for 2-3 minutes (but watch it like a hawk!). Let it rest for 5 minutes before serving – I know it’s hard to wait, but trust me, it’s worth it!
Tips for the Best Pepperidge Farm Stuffing
After making this stuffing for years (and eating way too many test batches), I’ve picked up some tricks that take it from good to “can I get this recipe?” good:
- Toast the stuffing mix first – Spread the cubes on a baking sheet at 300°F for 5 minutes before using. It adds incredible depth of flavor!
- Fresh herbs make all the difference – Swap dried sage and thyme for fresh if you have them (use 1 tbsp each). The aroma will knock your socks off.
- Broth temperature matters – Warm your chicken broth slightly before adding – cold liquid slows down absorption.
- Don’t overmix! – Gently fold everything together just until combined. You want to keep those bread cubes intact.
Follow these simple tips and your stuffing will be the star of the table – guaranteed!
Variations for Your Pepperidge Farm Stuffing Recipe
Once you’ve mastered the basic recipe, have fun playing with mix-ins! My family goes wild when I add:
- Sausage: Brown 1/2 lb of breakfast sausage with the onions for hearty flavor
- Mushrooms: Sauté 8 oz sliced creminis until golden for earthy depth
- Apples & Walnuts: Toss in 1 diced apple and 1/2 cup toasted walnuts for sweet crunch
- Cranberries: Stir in 1/2 cup dried cranberries for festive tartness
The possibilities are endless – make it your own!
Serving Suggestions
This stuffing shines alongside roasted turkey (obviously!), but don’t sleep on serving it as a main with a fried egg on top. A sprinkle of fresh parsley adds that perfect pop of color and freshness. For holiday meals, I love pairing it with garlic mashed potatoes and green bean casserole – the ultimate comfort food trio!
Storing and Reheating Leftover Stuffing
Let’s be real – leftovers are sometimes even better than the first serving! To keep your stuffing tasting fresh, transfer it to an airtight container and pop it in the fridge. It’ll stay delicious for 3-4 days. When reheating, I always use the oven (350°F for about 15 minutes) to bring back that perfect crispy texture. If you’re in a hurry, the microwave works too – just sprinkle a few drops of water over the top first to prevent drying out. Pro tip: Leftover stuffing makes killer breakfast hash – just fry it up in a skillet with some eggs!
Nutritional Information
Now, I’m no nutritionist, but I know folks like to have an idea of what they’re eating – especially during those indulgent holiday meals! Keep in mind these nutritional values are just estimates and will vary based on the specific ingredients you use. Things like the type of broth (low-sodium vs regular) or how much butter you add can make a difference. The beauty of this Pepperidge Farm stuffing recipe is that it’s made with simple, wholesome ingredients – no mystery additives here! As with any good comfort food, enjoy it in moderation and savor every delicious bite.
Frequently Asked Questions
Over the years, I’ve gotten so many great questions about this Pepperidge Farm stuffing recipe – here are the ones that come up most often:
Can I use vegetable broth instead of chicken broth?
Absolutely! Vegetable broth works beautifully for a vegetarian version. Just make sure to use a good quality one – the broth really carries the flavor here. My mushroom-loving friends swear by using mushroom broth for extra umami kick!
Why is my stuffing coming out dry?
Oh no – dry stuffing is the worst! Usually this happens if you didn’t use enough broth or if the oven temp was too high. Next time, try adding an extra 1/4 cup broth and check your oven thermometer. The stuffing should look moist (but not soupy) before baking.
Can I prepare this stuffing ahead of time?
You bet! I often mix everything the night before, cover tightly, and refrigerate. Just add 5-10 extra minutes to the baking time since it’s going in cold. The flavors actually develop even more this way – bonus!
What’s the best way to reheat leftovers?
My secret? Sprinkle a tiny bit of broth over the top and cover with foil. Bake at 350°F until warmed through, then remove the foil for the last few minutes to crisp up. Microwaving works in a pinch, but the oven keeps that perfect texture.
Share Your Experience
Did this Pepperidge Farm stuffing recipe become your new holiday favorite? I’d love to hear! Drop a comment below and let me know how it turned out – or better yet, snap a photo of your golden-brown masterpiece. Nothing makes me happier than seeing your family enjoying this comfort food classic!
Print
Pepperidge Farm Stuffing Recipe
- Total Time: 50 minutes
- Yield: 6 servings 1x
- Diet: Vegetarian
Description
A simple and delicious Pepperidge Farm stuffing recipe that pairs perfectly with roasted meats or as a standalone dish.
Ingredients
- 1 (14 oz) package Pepperidge Farm Herb Seasoned Cubed Stuffing
- 1/2 cup butter
- 1 cup chopped onion
- 1 cup chopped celery
- 2 cups chicken broth
- 1 tsp dried sage
- 1 tsp dried thyme
- Salt and pepper to taste
Instructions
- Preheat oven to 350°F (175°C).
- Melt butter in a large skillet over medium heat.
- Add onion and celery. Cook until softened, about 5 minutes.
- Stir in stuffing mix, sage, thyme, salt, and pepper.
- Pour in chicken broth and mix well.
- Transfer mixture to a greased baking dish.
- Cover with foil and bake for 30 minutes.
- Remove foil and bake for another 10 minutes until golden brown.
Notes
- You can add cooked sausage or mushrooms for extra flavor.
- For a crispier top, broil for the last 2-3 minutes.
- Let the stuffing rest for 5 minutes before serving.
- Prep Time: 10 minutes
- Cook Time: 40 minutes
- Category: Side Dish
- Method: Baking
- Cuisine: American
Nutrition
- Serving Size: 1/6 of recipe
- Calories: 250
- Sugar: 3g
- Sodium: 800mg
- Fat: 12g
- Saturated Fat: 7g
- Unsaturated Fat: 4g
- Trans Fat: 0g
- Carbohydrates: 30g
- Fiber: 2g
- Protein: 5g
- Cholesterol: 30mg
